Garage door springs control most of the operation of your garage door. But they can also wear out and break over time, creating operational problems and maybe safety concerns. Given their heavy weight, replacing these springs calls both accuracy and caution. Although this article will walk you through the necessary procedures to securely repair garage door springs, it is advised always to always use a professional if you are not handy or knowledgeable with such jobs.
Why Garage Door Springs Break
Made with a specified life cycle in mind, garage door springs typically range from 10,000 to 20,000 cycles—one cycle equals opening and closing the door once. The repeated tension and release over time strains the springs greatly, and at end this causes breakage. This might make opening your garage door difficult or impossible.
A spring gap indicates rather obviously that the spring is broken. Since their lifetime is usually the same and would most likely break at the same time, it is advised under such conditions to replace both springs even if only one is damaged.
Tools You’ll Need
Get the required tools before you start to guarantee a safe completion of the job:
- Turning bars: Turning bars enables one to wound and relax the springs..
- Using a 3/8-inch and a 9/16-inch wrench can loosen set screws and bolts..
- Vice grips: All during the operation, vice grips hold firmly in position pieces..
Step 1: Disconnect the Garage Door Opener
Starting with detaching your garage door opener arm, try to avoid any disturbance during operation. Pull the release cord to disengage the opener from the door and, when necessary, physically move the door. This stage guarantees that the door won’t move unintentionally throughout the process and gives enough room for you to operate.
Step 2: Unwinding the Unbroken Spring
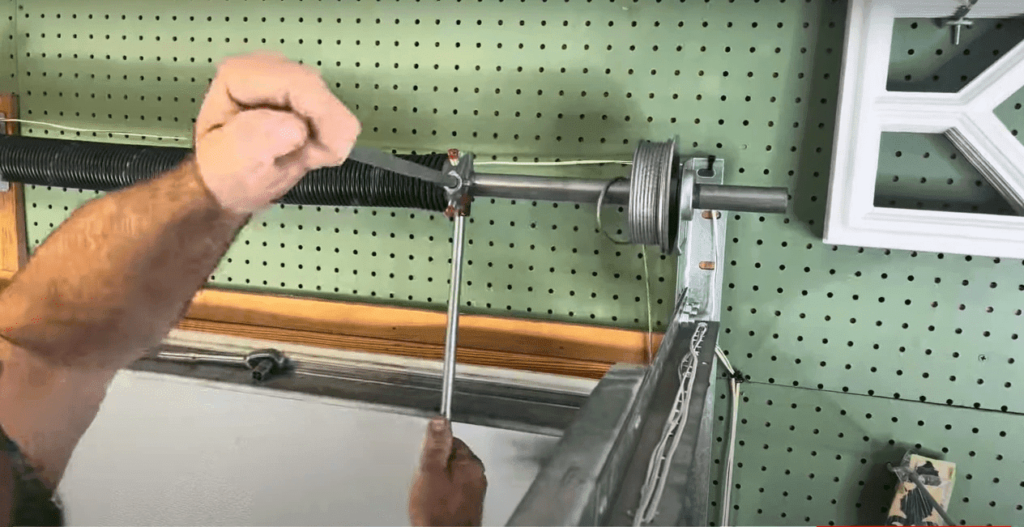
It’s time to progressively relax the spring still in place after the opening disengagement. Move the rotating bars in quarter rotations to release the tension from the spring cone, the metal portion with set screws attached. The height of your door determines the rotations required:
- 7-foot door: 28 quarter turns
- 8-foot door: 32 quarter turns
As you relax, make sure your body free of twisting bars and other moving components stays injury-free..
Step 3: Loosen the Set Screws
Use your 3/8-inch wrench to loosen the set screws preserving the spring in place once the tension is released. These screws tie the torsion bar to the spring. You simply need to relax them enough to release the spring; you do not have to remove them totally.
Step 4: Remove the Broken Spring
Once the untangled, intact spring has been straightened, work on the broken spring. First remove its set screws; then slip the spring off the torsion bar. This article helps to maintain the torsion bar, therefore remove the spring carefully considering the bearing at the center wall bracket.
Step 5: Loosen the Drums and Remove the Cables
To preserve cable alignment, the drums must then be relaxed at the ends of the torsion bar. They have set bolts, like the springs do. Sliding the drum along the torsion bar will release these bolts. Look for any fraying or damage in the cables as you work; replace any that call for it. Once the drums have gone free, cut off the connection from them.
Step 6: Installing the New Springs
Since you have taken out the old springs, it is time to install the new ones. Garage door springs fall into two varieties:
- Red cone: Shows the left-side, right-hand winding spring going beside the door.
- Black cone: Black cone indicates the left-hand wound spring located on the right side of the door.
Make sure the black cone spring is on the right and the red cone spring is on the left then slide the fresh springs onto the torsion bar. Slide the drums back into place, exactly as with the original springs.
Step 7: Securing the Springs and Drums
Tightening the set screws locks the springs and drums once they have been replaced on the torsion bar. To help to guarantee everything is in place, make sure the screws pierce the torsion bar without breaking the bar.
Then back-first slide the wires through the drum slots. The cables remain secure and tautness if they are tightly wrapped into the drum grooves. To halt any movement under operation, lock the torsion tube in place with a set of vice grips.
Step 8: Winding the New Springs
Time to wind the fresh springs aligns with the wire alignment and tightness. Again, quarter turn wound the springs using the turning bars. An 8-foot door will rotate 32 quarters; a 7-foot door will need 28 spins, just as in unwinding. Before every cycle, make sure the bars completely seat in the spring cone so you can keep control over the winding process.
Step 9: Final Adjustments
Once all the springs are wrapped, fine-adjust any required elements to guarantee the door opens without problems. Simple hand action ought to be able to open and close the door; the springs should be equally tight. Change the springs to either improve or release tension if the door seems too heavy or does not lift correctly.
Step 10: Reconnect the Opener
Pulling the release cord and moving the garage door opener arm back into position can help to reattach it once you have checked its openness. Check the opener to see whether everything is running as it should.
Safety Considerations
The great stress in the garage door spring replacements makes them inherently risky. One has to utilize suitable equipment and observe all safety precautions. Should at any level you feel uncertain or uneasy, do not hesitate to call a professional garage door repair company to manage the procedure for you.
Conclusion
Changing garage door springs calls not just tolerance but also the correct equipment, education, and sharp eye for safety. Using this manual will help you to approach the project boldly. Although safety should always come first, if in doubt rely on the experts to manage this demanding work , call a specialist to change broken spring can cost you around $150 to $350


