Fixing a garage door cable frays or breaks is a necessary task; nonetheless, one should do this gently as the wires are under a lot of strain. Apart from the springs, the garage door cables provide flawless operation of lifting and lowering the door. A damaged wire can make the door useless or maybe compromise safety. While this guide provides a thorough walk-through for do-it-yourself repairs, keep in mind that inappropriate handling of garage door cables and springs can cause injury. If you are unskilled or timid, see a professional; it is usually a wise idea. For a seasoned do-it-yourselfer, however, this may be a realistic task with the right tools, preparation, and safety considerations.
Step 1: Disconnect the Garage Door Opener
Before started, unplug the garage door opener from the power socket. This avoids any inadvertent running-through the door while it is under repair. Usually a red cord, first pull the emergency release wire to disconnect the door from the automatic opener mechanism. This allows you manual manipulation of the door.
Step 2: Open the Garage Door and Secure It
Hand lift the garage door all the way up until it is totally open. Keeping the door in place calls either locking pliers or C-clamps. Clamp them onto the garage door tracks straight under the bottom rollers to stop the door from sliding while you’re working. Check the tightness of the door to avoid damage or injury.
Step 3: Release the Tension in the Springs
Garage door cables are highly stressed whether working with torsion or extension springs. To repair the cable, you first need to let off this tension:
- For torsion spring systems (located above the door): For systems using torsion springs—above the door—place a winding bar into one of the assembly’s winding cone holes. Holding tightly to the turning bar, use a tool to release the set screws. One quarter-turn at a time, gently but under control unwind the spring.
- For extension spring systems (mounted along the horizontal tracks): For extension spring systems, which are set alongside the horizontal tracks, you will have to release the pulley system. Check the spring to be free of tension before you begin. Unhook the extension spring off its supporting base.
Step 4: Remove the Old or Broken Cable
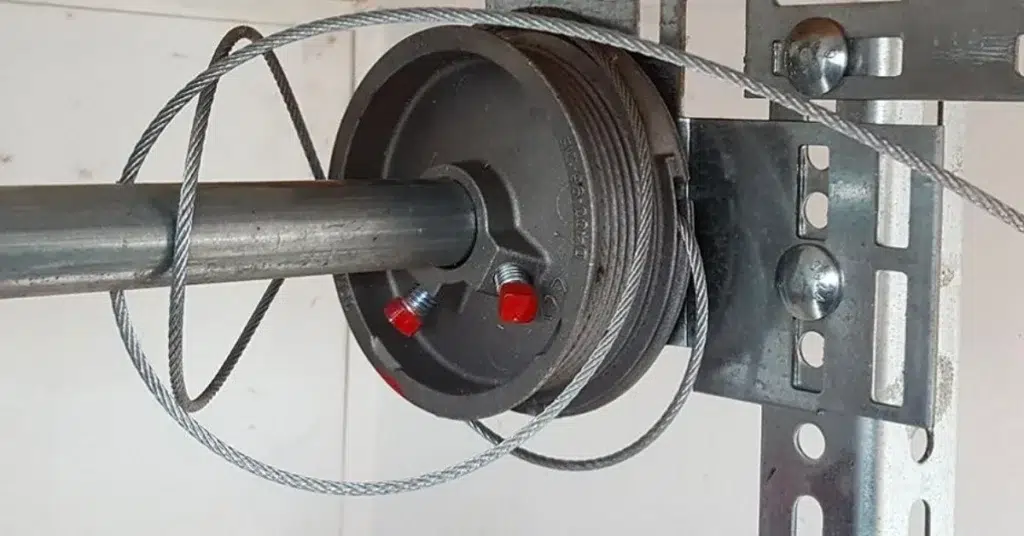
Look for the garage door cable, which linked to the bottom of the door by a bottom bracket travels alongside the side of the door to a drum at top. Unhook the broken cable coming from the bottom bracket slowly. Then remove the cable from the drum adjacent to the torsion spring assembly. Note the cable’s installation method to be able to replicate it with the new one.
Then slide the cord off the drum. Usually discovered in the grooves of the drum, the cable should be unthreaded softly with considerable time. As you will be laying the new cable in the same manner, know the correct cable configuration.
Step 5: Install the New Cable
Attach the freshly purchased garage door cable to the bottom bracket from where the old one was taken down. From the side of the door, pass the cable over the top drum. Correct cable placement in the drum’s grooves will help to avoid operational issues down road. Fastener the cable and tightly pull it in place.
Check both sides to ensure the wires are exactly aligned and put in their drums. Misalignment might cause the door to jam or run differently.
Step 6: Retighten and Reattach the Springs
Since the new wire is attached, it is time to relax the strain in the springs.
- For torsion springs, For torsion springs, reinsert the winding bars into the winding cone; then, gently wind the spring back in the correct direction. Make sure you rotate for the manufacturer’s suggested proper count. Tight the set screws on the winding cone to fix the spring in place.
. - For extension springs, Rejoin extension springs to their pulley or bracket system. Make sure the tension returns consistently.
Step 7: Test the Garage Door
Once the wires and springs are securely reattached, carefully remove the clamps or locking pliers allowing the door to remain open. Lower the door by hand to ensure perfect operation. The door should move without uneven motion or jerking.
.
Last, re-connect the garage door opener to the door and then back into the power source. Use the opener to confirm the door opens and closes without problems.
Step 8: Final Safety Check
Before considering a full repair, make a last safety check. Look for any proof of unusual running sounds, loose wires, or misaligned rails. Should things seem to be in order, the repair is accomplished. Should you run across any issues, test the spring tension and cable alignment..
In conclusion, fixing a garage door cable
Although fixing a garage door cable sounds like a difficult chore, for a competent do-it-yourselfer it may be under control with the correct equipment, safety measures, and detailed instructions. Whether your cable is frayed or broken, using the correct methods guarantees that your garage door will be returned to flawless and safe running state.
Professional garage door cable repair costs between $150 and $350, depending on the door and damage. Avoid hazards by consulting a professional if you’re worried about mending a garage door wire yourself.


